How To Whiten Teeth With Photoshop

hqdefault


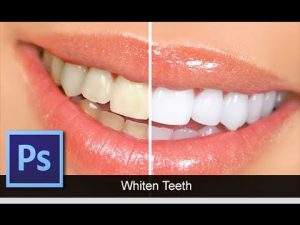
How often do you see a photo of yourself and wish you had whiter teeth? Photoshop CC makes it easy to get those pearly whites with layer adjustments and vibrance.

Go to Layer > New Adjustment Layer > Vibrance, and reduce the vibrance to -60.

Then, choose the Vibrance Layer in the Layers Panel, and choose Layer Mask.

Next, press Command/Control I to invert, which fills the layer mask to hide the adjustment made to the Vibrance Layer.

Finally, use the Brush Tool with a small, soft-edged brush set at 50% opacity and paint over the teeth that need whitening.

Aside from that we’re gonna show you a easier ways to whiten teeth on photoshop !

Using the Hue/Saturation Tool

Right-click the Lasso Tool and choose select the Polygonal Lasso Tool.

image12

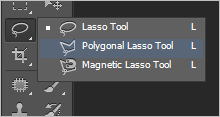
Although teeth are slightly rounded at times, this tool will work great for what we want to do.

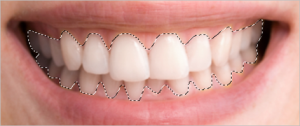
Click on a corner of the mouth where the tooth and gum meet, and then move the mouse to a point where you can cover the tooth. Keep moving along the lip or gum (wherever the teeth happen to rest in the photo) until you cover the whole mouth.

Partway through, the canvas should look similar to this:

image13

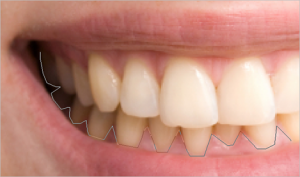
When the selection is completed, it shall look like this one:

image14

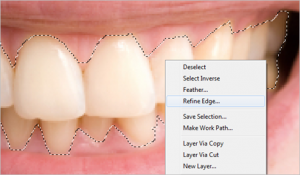
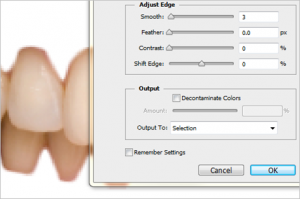
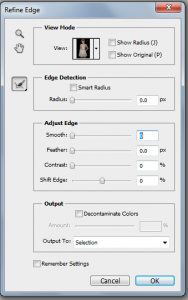
Now right-click in the teeth area and select Refine Edge. Ensure the same lasso tool is still selected when right-clicking.

Slightly adjust the Smooth factor so the selection edges aren’t sharp and unrealistic looking.

image15

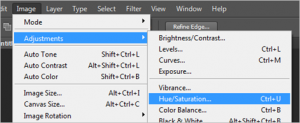
Press OK and then head up to the Hue/Saturation item in the Image > Adjustments menu.

image16

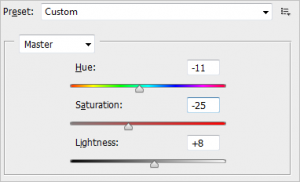
The adjustments made in this window will change the tone of the existing color of the teeth. I find this to create the most natural-looking white teeth in Photoshop.

What you want to do is adjust the Hue as a decrease to the point of the teeth making a near red color. Then decrease the Saturation to reduce the red color and bring it to a more white or grey color. Finally, (and be stingy here) increase the Lightness. This last adjustment isn’t always necessary but it does add a nice bright feel to the teeth. Don’t overdo it, as it can easily make the image rather unrealistic.

image17

Our final result when using the Hue/Saturation tool is a quick and easy bright color to an otherwise slightly yellow mouth.

image18

Cool Tip: Press Ctrl+D to quickly deselect a selected image, returning it to a normal appearance.

Photoshop Tips and Tricks for Beginners: Custom Shape Tool

Custom Shape Tool

Did you know that in addition to photo editing, you can also easily add shapes and design elements to your Photoshop creations by using Custom Shape Tool?  The Tool Panel has all of the basic shapes you need like square, line, circle, ellipse etc in addition to a whole slew of extended options. The Custom Shape tool is easy to find in the Options Bar, represented by an icon that kind of looks like a puzzle piece.

Access even more shapes by clicking again on the small arrow on the right side of the panel. If you are looking for banners, speech bubbles or arrows of all kinds, this is just the tool for you.

Photoshop Tips and Tricks for Beginners: Magnetic Lasso Tool

The Magic Wand is another selection tool, ideal for when you are working with a background that is more monotone and consistent (like a solid color or clear blue sky).

The Magic Wand tool is most often used to switch up backgrounds or large color blocks. To use it, choose the Magic Wand tool from the tools panel and click on the part of the image you want to select. Make sure that you toggled the “add to selection” option on the top bar (icon of two squares) so that you can move forward with switching up the colors and tones of your selection.


Photoshop: Tips and Tricks for Beginners

Change the Unit of Measurement

Change Measurement In Photoshop

A short and quick way to switch between units of measurements that you’re working with is to place your cursor on one of the rulers on your grid (press Ctrl + R to show or hide the rulers), and right click, then choose a new unit from the context menu. There you’ll find a wide variety of units, from centimeters to pixels, millimeters, points and even percents.

Photoshop: Tips and Tricks for Beginners

flamingo

Transform: Change the size of an image, rotate, flip or distort it!

Click Edit > then click Transform > and select the action you desire.

Or try these shortcuts to make life even easier:

Press Ctrl + T on your keyboard and a bounding box will then appear around the image, indicating transformation. This means you can now resize your image. The best way to do so is by placing the cursor on one of the rectangle corners of the box and then dragging the corner while holding the Shift key. When you’re finished just press Enter and you’re done.

To flip your image vertically or horizontally press Ctrl + T and then right click your mouse. A popup window will appear with a few options for rotating and flipping the image. Select the action you want and when you are done press Enter.

To distort or skew an image press Ctrl + T and then place the cursor on whichever corner you want to distort. Press Ctrl while holding your mouse down on whichever corner of the image you’re looking to morph and drag it down to your desired point, finally press Enter to activate.


Shoot Hazy and Ethereal Photos Using a Sandwich Bag and Colored Markers

LU9BCyF-copy

Photographer Jesse David McGrady has a super simple trick for adding a hazy, ethereal effect to your photographs: wrap a plastic sandwich bag around your lens. It sounds ridiculous and silly, but the results you get are actually quite nice!

First, find yourself a sandwich bag — those thing plastic bags that you carry sandwiches around in.

step11

On the closed side of the bag, use your hands to tear a hole. Don’t use scissors, since you’ll want the edges to be rough, uneven, and slightly random.

step31

Take the open end of the bag and slide it over your camera lens, with the hole end extending a little past the end of your lens. You want to make sure it can be seen in your viewfinder. Don’t cover up the middle portion of the frame, since you’ll want a clear section to see your subject through.

sample14

Voila! You’ve got yourself an instant hazy, retro, light leak look for just pennies:

Okay, a sample photograph of an empty smoothie glass is a bit lame, but check out what McGrady has been able to do using this “hack”:

jwoMMtf-copy

Zs2VmKX-copy

To customize the look you get, you can take a colored pen and draw over the plastic bag, adding color to certain parts. Here are a couple of photos shot by McGrady using a baggie that was marked with purple:

You can find more of McGrady’s photographs shot using this trick/technique/hack here and here.

Photography outsourcing: Why you should go for it !

Photographers, generally gets uneasy when they hear the word “outsourcing”. Noway you would want to ruin your concept of the image by letting anyone do the post production. I mean how could you be a photographer and outsource your work, is it even your work anymore? How can anyone else implement the vision you had while taking the shot? 

We think the concept to outsource photo editing is one that is very hard for most photographers to tell themselves that it is the right choice, but we’re here to tell you, that at a certain point in your career, it most certainly is the right choice.

If you’ve ever read the E-Myth (and if you haven’t go pick it up now!) it talks about how the death of a business is when the technician is always in control, that you need the manager and entrepreneur to play equal roles. When you, the photographer, spend all your time sitting at a computer editing your sessions, the technician is in control and consumes the time you could be doing management or entrepreneur work.

The time would be much better spent putting your face out in the public, booking more clients, shooting additional sessions, or collaborating with other members of your community. Your time has value, and there comes a point that you are actually holding your business back by doing that type of work. There will become a point when your time holds a much higher value than the cost of paying to have your edits done by somebody else, you will in fact be saving your business money!


So when is a good time to consider it?

  1.  You need to know your style.

    You need to have it nailed because if you’re going to be outsourcing that job, you need to be able to tell the company or person how to get the job done. And being able to describe your editing style is also something that you should feel comfortable doing and if you don’t know how to answer that, then take a step back and evaluate your work some.

  2. Have your SOOC pretty consistent and streamlined.

    This goes along with the above. But we do think it’s worth mentioning, that it has been our experience, that even when you feel pretty good about your SOOC shots, once you start to outsource, we can almost promise you that they will get even better, consistent if you will. It just kind of happens that way.

  3. Evaluate your time.

    This next piece is up to interpretation as each of our lives are filled very differently. But you need to evaluate how much of your time is consumed and if that’s at a level that you’re wanting it to be, maybe you’d like another hour per day to spend with your family. Have you run out of hours in your day? It’s time to asses when the number of sessions is

    a) consistent
    b) at a point where you have run out of time to ‘do-it-all.’

  4.  Maybe you don’t enjoy editing!

    Well this one may throw you off, but if you’ve got your style figured out and you’re rocking your SOOC; maybe you’re not a ‘professional’ maybe you’re shooting for YOU! But just like that other photographer, your time is precious and maybe, just maybe, you don’t enjoy the editing. Yes, I think even as a hobbyist, choosing to outsource is totally reasonable and ok!

    Now do you need all four steps checked off the list to decide to outsource? Absolutely not. We think 1 & 2 are essential to make the switch but then I think you either fall in category 3 or 4, not necessarily both.
    Outsourcing shouldn’t be a big scary word that you avoid, and it shouldn’t be something you take lightly either, but it is something that should make you happy. At the end of the day you should feel good about your choice, own it and start doing all those other things you could be doing with your time and business.

Background color change- BEFORE & AFTER

tumblr_ltvgn7qjED1qjljs9

Step 1: open up your Photoshop and the picture you want to change the background colour.

Step 2: click the quick selection tool here and use that tool to select the person. if the selection goes out of the person, subtract the selection using this  you can find it at the top of Photoshop

tumblr_ltvdptlCLX1qjljs9

Step 3: after that, at the top of photoshop click refine edge. here

this should pop up.

tumblr_ltve4ia03V1qjljs9

click the smart radius. after that adjust the radius. mess around with it. after you’ve finish click ok.

Step 4: right click on the picture, select inverse like this  after that click layer>new fill layer>solid color. like this

Step 5:  After that simply click ok without doing anything. After you click ok. this will pop up.

tumblr_ltvfz3EMNq1qjljs9

Step 6:  Choose any solid colour you want to fill your background. after you’ve finish click ok.

Step 7:  you’re done! click ‘save’ or ‘save as’.  make sure that you change the format into JPEG.